Quick Start
Installation
Install dotnet sdk 8.0 or higher version sdk
Download luban_examples project. This project contains test configuration and a large number of sample projects. For convenience, the files mentioned later refer to the files in this project by default
Luban in the luban_examples/Tools/Luban directory may not be the latest version. Developers can either download the latest version of Luban directly from release or compile it from the Luban source code themselves.
Prepare to configure the project
Directly use the MiniTemplate in the luban_examples project, and modify the subsequent operations based on this.
Create Reward table
Create reward.xlsx file in MiniTemplate/Datas directory, the content is as follows:
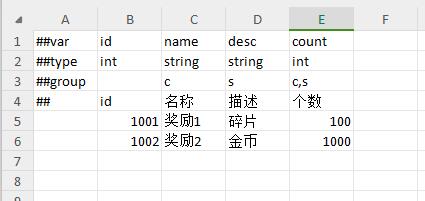
Briefly introduce the file format:
- The first row is the field name row. Cell A1 must start with ##. Indicates that this is a valid data table.
- The second row is the field type row. The first cell must be ##type.
- The third row is the grouping row.
cmeans the field belongs to the client,smeans it belongs to the server,c,smeans it belongs to all at the same time, and leaving it blank also means it belongs to all. - The fourth row is the comment row. Start with ##. There can be 0-N comment rows, and they can appear at any position
- The fifth row is the data row.
luban does not limit the position and number of header rows. Lines like ##xxx can be ordered and positioned at will, and ##group and ## lines are optional.
It is recommended to use xx_yy_zz style field names, because luban will automatically convert them to the names recommended by the language according to the generated language. You can also manually specify the command style you want.
Add the reward table declaration to __tables__.xlsx in the Datas directory, as shown below:

The reward table is now created!
Generate configuration data
Directly run MiniTemplate/gen.bat (Win platform) or MinTemplate/gen.sh (MacOS or Linux platform).
If the operation is successful, the command line interface will be similar to this, ending with a bye~.
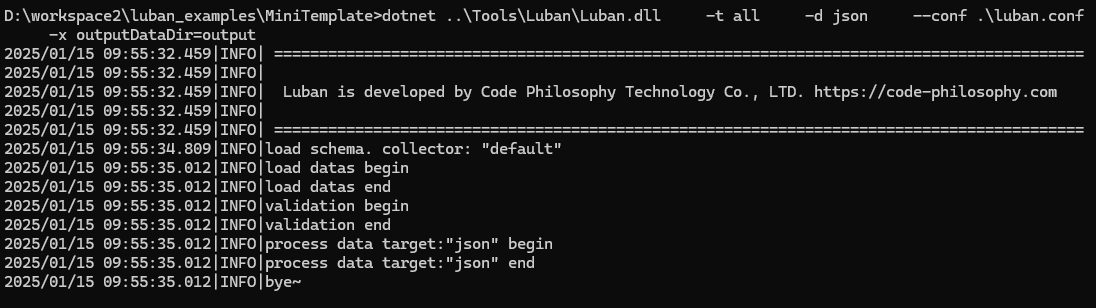
The json configuration data is generated in the MiniTemplate/output directory, which can be opened and viewed by yourself.